Showing posts with label color. Show all posts

Friday, February 28, 2014

More knitting for yarn

After TW's Wallaby I didn't really have any big projects so decided to pick up a few more knitting jobs just to have something to do (and hey, more yarn!)

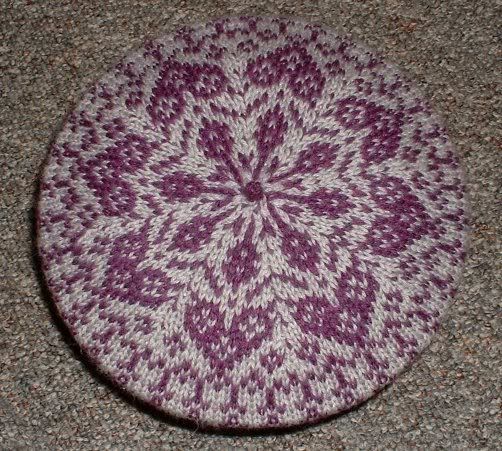
first up was a really nifty colorwork tam:
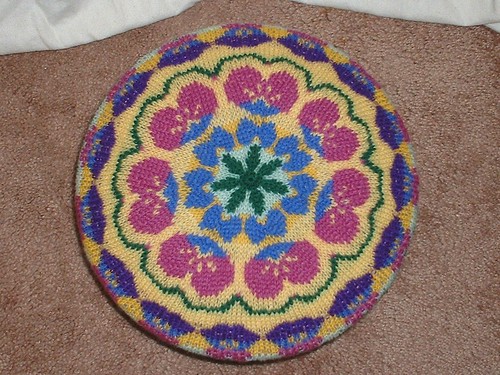

pansy garden
tam blocking 01-22-14 top


Pansy Garden Tam (rav pattern link, web link here)


the pattern came in a kit with pre-wound balls of jaggerspun wool. It was very clearly written, and while a few of the colors came a bit close to running out, it turned out great. I love color work, and this was such a pretty design!


pansy garden
tam blocking 01-22-14 side


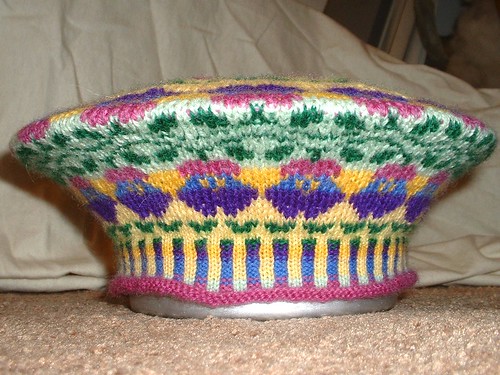
Rav project page here


***


After the Tam there was a nice trip Through the Woods!
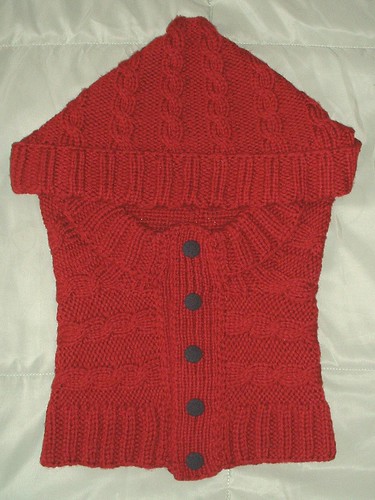

through the
woods finished


The Through the Woods hood (rav link) was great fun to knit. And I think I want one for myself too!


I was almost done when I ran out of yarn, so the great lady I was knitting for sent more, with the request for a pair of matching mitts:


through the
woods mitts 02-18-14


Thorough the Woods Fingerless Mitts. (rav link) by the same designer.


Both of these projects were a lot of fun, the cables were simple, but very classic looking, and I just love how the hood turned out.


Project links: hood, mitts.

Friday, December 21, 2007

Winter wonder wear

I finished my mittens!

Photobucket

I'm incredibly happy with how they came out, I wore them to knit night with me on Monday, and everybody commented on them. I had a problem with my last pair in that the wind was always blowing up my sleeves, and there was always a gap, so I made these extra long to stop that.

Photobucket

I had plenty of teal (and purple) yarn left over so I decided to make a matching tam (because I'm obsessed with tams and berets)


This is Tam C from knitty.com

Photobucket

it fits perfectly and I love the way it looks. I had a little trouble with the decreases on the top, for some reason they came out a bit loose and you can see the stranding behind them, this would bother me more if it weren't for the fact that it makes the top look amazingly snowflake like.

Photobucket

and just to keep myself busy the other day I decided to make a mug cozy:

PhotobucketPhotobucketPhotobucket

The pattern is from the holiday gifts 2007 issue of interweave knits. It was incredibly quick, and very easy to modify to fit my mug. And it really works too; my tea does stay warm longer with it on.

This will probably be my last post until after Christmas, I hope everybody has an awesome holiday!

Saturday, December 15, 2007

Another beret, and a mitten.

Chevron Lace Beret


Photo Sharing and Video Hosting at Photobucket

I don't like it

I did the recommended double ribbing, and it's way too loose, I think it's not just the ribbing but the huge number of stitches it has you cast on, I probably should have cast on as for the smaller size and then increased way more. Then the weird increases to the middle, make it an odd shape while wearing, and it doesn't 'flop' right.

Ah well, a learning experience.

I used my own hand dyed wool, and AM very happy with the way the semi solid variegation worked out, very neat. I liked it so much I dyed up another skein in teal.

Then worked up a mitten pattern to use the leftover blue/purple, and the teal together.

Photo Sharing and Video Hosting at Photobucket

I'm really; really happy with the way these are turning out. I finished the first in one day, and have already finished the ribbing on the second.

Photo Sharing and Video Hosting at Photobucket

I used the generic Norwegian mitten pattern from Hello Yarn

snowflakemittens
(click on the picture for a bigger version to print if you'd like to make them too.)

Friday, December 07, 2007

another tam

Gramma K's Fair Isle Tam

Photo Sharing and Video Hosting at Photobucket

after knitting and falling in love with my first beret, I decided my life would not be complete without several different types of tams and berets to wear. this is the first on my list.

this was an incredibly fun and easy knit, I had an awesome time making it and can't wait to wear it out! It was a little touch and go for the yarn. I used the grey leftover from knitting Bill's squirrel and oak mittens, (I had roughly 65 grams left after the mittens). The purple was a test skein I bought to swatch for a sweater I decided I didn't really want, so I started with slightly less than a full skein. I finished the hat with barely 10 grams left of the purple and only 15 grams left of grey. whew!

next on my list I think will be one of the Three Tams from Knitty
but first I need to get more yarn, and I definitely want to try it with the self striping Noro, I really like that look.

Tuesday, November 06, 2007

knit night review and two colour baby mittens

Last night was my local knit night.
I had a great time as usual. I met this wonderful woman who crochets the finest most gorgeous doilies and things. She brought in a beautiful bedspread, some lamp shades and a bunch of doilies. She even had the most amazing fillet crochet runner; it was of a lady bathing surrounded by cherubs, perfect! And using a much smaller thread and hook than I have yet.

Also last night I passed on a pattern I designed.
One of the ladies just recently had two grandchildren, and wanted to knit them mittens, but she wanted colourwork. Well I told her I would look around and see if I could find anything like what she described, and if I couldn't I would make her one.

Well I couldn't so I made her one.

I figured I would pass it on to all of you as well.
It hasn't been fully test knitted yet, I made a small lopsided prototype when I was writing it, but have made several changes to the pattern since then:

Photo Sharing and Video Hosting at Photobucket

If you would like the pattern, feel free

If you knit this pattern I would LOVE to see, please send me pictures! (Or better yet, post to Ravelry! pattern link for Ravelry here)

Wednesday, October 31, 2007

Happy Haloween!

Photo Sharing and Video Hosting at Photobucket

Aren’t they spooooooky?
Ok, maybe not, by they are very autumnal, it's a pair of socks I'm making for Bill out of some of the yarn I bought at Rhinebeck. Dorchester Farms Hand painted.

I was hoping it would turn out more like the toes – all mottled, but the striping is pretty spiffy too, kind of looks like tiger stripes. One skein is striping thicker than the other, but that's to be expected with two separate skeins of hand painted yarn. This is why I prefer just one big skein.

I did finish the squirrel and oak mittens too, on Saturday actually; I'm just a big slacker and didn't get around to posting about it until now.

Photo Sharing and Video Hosting at Photobucket

Photo Sharing and Video Hosting at Photobucket

I had a lot of tension issues; this was my first time doing stranded colourwork two at once. And most of it was car knitting, which is never too even to begin with.
I'm hoping a good blocking will help them, but right no Bill loves them as they are and won't give them back, he's already worn them out several times. Maybe they will even out with wear, and I know I'll be able to block hem in the spring when I was all the winter wear.

Then there is this little guy:

Photo Sharing and Video Hosting at Photobucket

One of the ladies at my knit night recently became a grandmother and wants to make the little ones some winter mittens, but she doesn't want to knit just plain baby mittens, she wants color work, and not big motifs, but little all over ones, I went online and looked around but couldn't find much, and she refuses to improvise, so I'm working out a pattern for here with a couple of different colourwork patterns to choose from.

I hope everybody has a spooktacular day! I live too far out in the boonies to get trick or treat-ers, so I'm making muffins and Bill and I are going to watch movies tonight. Woo!

Thursday, January 25, 2007

A little too excited

Oops!


I got so excited over Lime and Violet in my last post I forgot to give an update on what I'm knitting!


I finished the hat I was knitting for my grandmother.

Photobucket - Video and Image Hosting

I used Lambs Pride Worsted in colour m-100 Supreme Purple, and a bit of some leftover grey.

Size 7 (4.5mm), 16" circular needles and This Pattern

It came out very soft and cushy and very warm, I think grandmother will like it. We go into Watertown again tomorrow, so I will give it to her then. She doesn't know I was making it, so I think she will be surprised!

And because I can't control myself I started the Squirrel and Oak mittens

Photobucket - Video and Image Hosting

I'm using my magnet board for the shawl though, and I'm about as far as I can get in the mittens without it now, so they will just have to wait until I finish the shawl to get any further.

(or until I loose all my willpower and go out and buy another magnet board.)

I started with my braided cast on but some how mucked it up in the first row, so it looks a little funky.

Also, I've been dying to try out some of the braid from Folk Knitting in Estonia by Nancy Bush, so I threw one of those in before starting the charts proper.

Friday, October 27, 2006

Braided Cast on

Braided cast on:
Photobucket - Video and Image Hosting

I love this cast on; it creates a lovely braided effect that is stunning on mittens or hats. It's perfect for two colour knitting, no need to fumble to add the second colour, it's already there! And it sets up your stitches perfectly for corrugated ribbing!

The site where I originally learned this technique did a terrible job at explaining it, and it took me forever to figure it out. I decided to make a better set of instructions after several people asked me how I did it.


**This cast on uses a modified version of the long tail cast on**
Tutorials can be found here: http://www.knittinghelp.com/knitting/basic_techniques/ (video)
Or here: http://www.butlercountryknit.com/longtail.pdf (PDF)
Or here: http://www.knitty.com/ISSUEsummer05/FEATsum05TT.html (scroll down)

Step 1:
Make a slip knot using two colours of yarn held together, place the knot on your needle. Hold the free ends out of the way.
Photobucket - Video and Image Hosting

Step 2:
Hold the yarn colour at the top side of the needle (green) around the front and then back of your thumb, with the tail hanging down the palm of your hand.
Hold the colour at the bottom end of your needle (red) around the front and then back of your index finger, with the tail hanging down the palm of your hand.
Hold the tails out of your way using the other three fingers of your hand.
Photobucket - Video and Image Hosting

Step 3:
Put the needle under and up through the palm side yarn coming from around your thumb, grab the front yarn going around your index finger and pull it through.
Photobucket - Video and Image Hosting

Step 4:
Release the yarn from around your thumb and tug at both yarns to snug the loop around the needle.
Photobucket - Video and Image Hosting

Step 5:
Move the index finger (red) yarn OVER the thumb (green) yarn and place on your thumb; place the other (green) yarn around your finger as before. (Always move the top (finger) yarn OVER the bottom (thumb) yarn to create the braided effect)
Photobucket - Video and Image Hosting

Repeat step 3-5 until as many stitches as needed are cast on.
Your yarn will begin to twist after a few stitches are made, don't worry, this is normal, just ignore it, or stop periodically and let your needle hang to untwist the working yarns.
twisty:Photobucket - Video and Image Hosting

If you have any questions or if anything is unclear, let me know and I'll try to explain better.
Enjoy!
:D

Powered By Blogger

Creative Commons

Creative Commons License
This blog and everything contained within is licensed under a Creative Commons Attribution-NonCommercial-NoDerivs 2.5 License.