The Thumb Trick:
Sometimes called an afterthought thumb, I first read about it in Elizabeth Zimmermann's Knitter's Almanac.
This method is used in fetching but it is also very common in a lot of stranded, and Norwegian style type mittens.
I really like this method because it's seamless; sometimes when patterns have you place stitches on a holder and then cast on the top stitches you can get an odd seam right in the crease where your thumb meets the hand, and that can be uncomfortable.
The only trouble that some people may have with this method is that you cannot immediately try on your mitten in progress, as you can with mittens where the stitches are put on holders. But if you want to you can just knit a few more rows and then pick up the stitches instead of waiting until the mitten is done, threading the waste yarn through them so you can try on your mittens as you knit.
The trick:
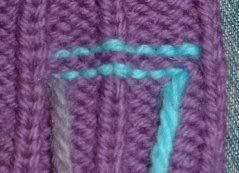
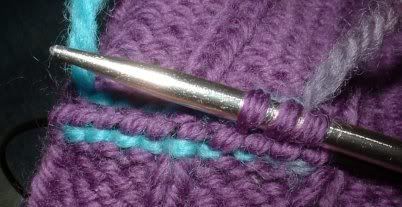
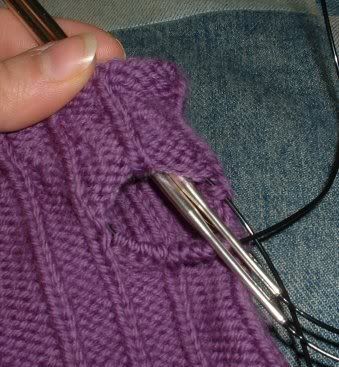
Knit to where you want to place the thumb hole, and take a length of contrasting yarn, and knit the thumbhole stitches with it instead of your working yarn:
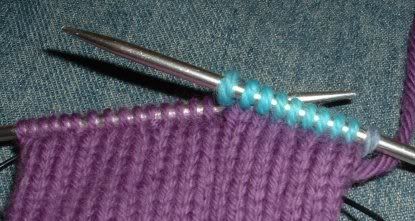
(see the working yarn, still on the right-hand side of the work?)

(see the working yarn, still on the right-hand side of the work?)
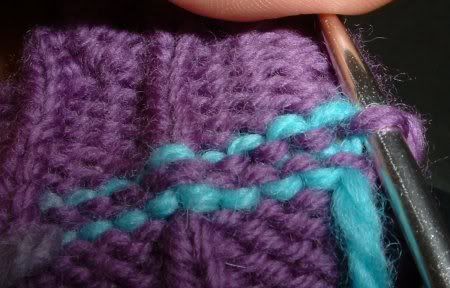
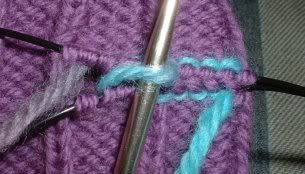
Then, slip all these stitches back onto your left hand needle purl wise:
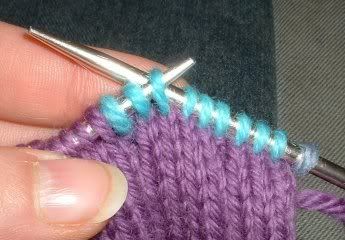


And knit across them, with your working yarn:

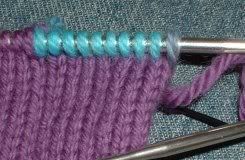
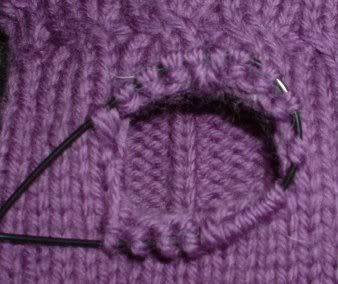
Here are the held stitches after a few rows have been worked:
(Fetching uses a ribbed pattern. When knitting with the waste yarn, just knit plainly, and when knitting back across the waste yarn, knit plainly again, then pick up any stitch patterns again once you've passed the thumb. If using colour patterns, they can be resumed right away as you are knitting over the waste yarn. It is just easier to pick up the stitches later if they are all knit.)

(Fetching uses a ribbed pattern. When knitting with the waste yarn, just knit plainly, and when knitting back across the waste yarn, knit plainly again, then pick up any stitch patterns again once you've passed the thumb. If using colour patterns, they can be resumed right away as you are knitting over the waste yarn. It is just easier to pick up the stitches later if they are all knit.)
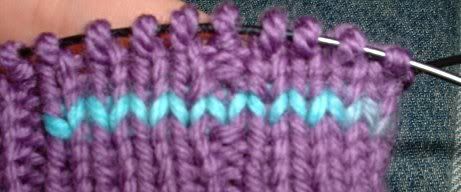
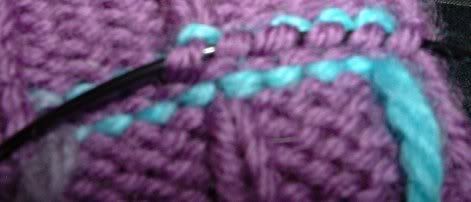
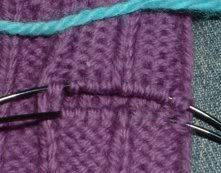
Finish the mitten, and then turn it inside out:
See the purple bumps in-between the blue bumps? Those are the stitches you'll be picking up.

See the purple bumps in-between the blue bumps? Those are the stitches you'll be picking up.
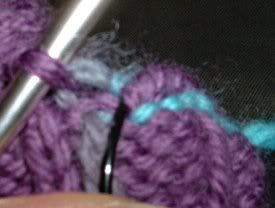
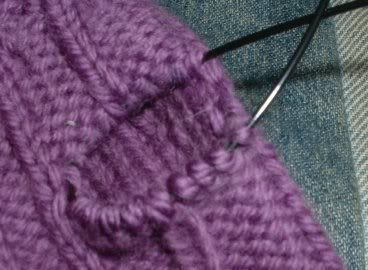
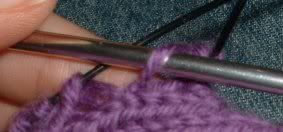
Start picking up the stitches using a pair of circular needles:

As it begins to get awkward to fit them on the needle, slide them onto the cord and continue picking up all along the top edge:

When you get to the end of the row, there will be a stitch where the waste yarn only holds half of it; you want to pick that stitch up too:

Then just turn the work upside down, and keep picking up the underside stitches too:
Keep a loop of the circular cord at the end, to separate the two sides.

Keep a loop of the circular cord at the end, to separate the two sides.
Here it is with all the stitches picked up:

The top row will have one more stitch than was originally knit onto the waste yarn, and the bottom should have as many as was originally knit.

The top row will have one more stitch than was originally knit onto the waste yarn, and the bottom should have as many as was originally knit.
Usually, patterns will say that after picking up stitches you'll have one side equal, and one side with one less stitch, but I find that the method I use results in fewer holes.
Now, start puling out the waste yarn, with no worries of a dropped stitch, since they are all already on the needles!

Here it is with the waste yarn removed, and all the now live stitches on the needles:

Pull the cord of the needle until there isn't a loop at the end anymore:

Stick the needles into the thumb hole and out of the mitten:
(The fetching are open at the top, so I stuck them out the top, if making a closed top mitten, just send them out the wrist.)

(The fetching are open at the top, so I stuck them out the top, if making a closed top mitten, just send them out the wrist.)
And pull them out, flipping the mitten right side out in the process:
Ta da! You are almost ready to start knitting your thumb!

Ta da! You are almost ready to start knitting your thumb!
I like to make sure the top and bottom are equal in stitch count, and it really helps to tighten things up and prevent holes if one more stitch is picked up and put on bottom needle:
If things are still a bit loose at the sides of the thumbhole, just pick up one more stitch at each end and knit it together with the next stitch on each needle on your first round.

If things are still a bit loose at the sides of the thumbhole, just pick up one more stitch at each end and knit it together with the next stitch on each needle on your first round.
From here you can either move all the stitches to DPNs or you can keep up with the circulars and knit the thumb magic loop style.
Knit your first round through the back loop for extra security and tightness, to further help prevent holes.
If doing colour work that requires a certain number of stitches, simply decrease or increase evenly along your first row to achieve that number.
![]()


 Fluffy Knitting Bloggers


46 comments:
Very helpful. :o)
I've been wanting to make a pair of these for a friend of mine, but the thumb had me a bit confuzzled. Now that I can see it, it makes perfect sense though.
You should crosspost this at Knitting; I'm sure there're plenty of people there who'll find it useful too.
I have made afterthought thumbs for mittens, but I didn't use the contrasting yarn stitch holder - I just cut a stitch, unraveled it to make an opening, put the stitches on several dpns and knit the thumb. EZ encouraged me not to be afraid of cutting knitted fabric.
http://static.flickr.com/70/202032926_fcf4a1cc46.jpg
Here's a pair of mitered mittens with afterthought thumbs that I made, a la EZ.
Beautiful mittens Sonja! I love that color way, I'm assuming it's a Noro?
I like the snip and ravel too, but I usually prefer this method because I can see where my thumb is going right away. (I may make tons of changes to knitting patterns, and often fly by the seat of my pants, but I'm not that spontaneous! :D)
Thank for the tutorial. I snagged a copy.
Thomasean
Thanks for allowing me to post this on Yarnival!
I too am making "fetching" fingerless gloves, and this is the exact spot I was stuck. Your tutorial was just what I needed to continue. Thank you! Thank you! Thank you!
Oh, thanks so much. I did a web search and this is EXACTLY what I was looking for!!
I am exactly like Sarah--I did a web search for pictures of this technique and found this post. THANK YOU SO MUCH!!!
Camy
THANK YOU!!!!
WOW! I can not believe what difference picture AND directions can do!
THANK YOU, for taking the time and energy to post this information.
I always relied on my Mom to help me out of a knitting jam, but she died from breast cancer and I can no longer ask her for help. I miss her and her help.
By you posting this allowed me to keep knitting which is something I have always enjoyed.
You are truly a very nice person.
I cannot tell you how helpful this is. You have done all knitters a great service here.
Any chance you have photos of what to pick up when picking up the two stitches between the bottom and top of the thumb on the Fetching pattern? I've tried several times, and just end up with large holes in the fabric. I'm not sure exactly which loop to pick up on the sides. Thanks.
Thanks very much for your clear narrative and illustrative pictures. I have been struggling with how to learn to make a thumb on a mitten. I have too many knitting books already, and not one of them had as good of pictures. Many thanks.
Thank you so much for this tutorial and helpful, clear photos. I'm an intermediate knitter but have never used this technique before and was having trouble finding step by step instructions. Sheryl in Providence, RI, USA
WOW! this is an awesome and clearly shown demonstration. Thank you!
Thank you so much for this tutorial. It was a sanity saver.
Every time i try and learn a new technique the pix always get in the way.I mean ,the picture shows the step but it always left me feeling like i was missing part of the step or if icould only see it in motion...
Your pictures were so clear it clearly showed the steps instead of a shot of the needles and a typed tutorial it had an accurate visual accounting of the technique.
Finally.yay!thanks
Thanks! I'm knitting the Fetching fingerless gloves, and I couldn't quite figure out this trick from the directions... (It seems I'm not the only one!)
I have made mittens, but not with this thumb type. Before I found your very easy to follow directions, I used sock yarn, then dental floss, to hold the shiches. It didn't work. I found your website, used a thicker yarn, followed your directions, and it was EASY, it WORKED, and THANK YOU!!!!
Realize this is an older post, but had to compliment you on the tutorial. It's a text-book example of how to write & illustrate a potentially confusing technique. Brava, & thank you.
Very easy to understand and I loved the pictures! I am not afraid of mittens and the thumbs now. My grandchildren thank you :-)
This is great! Thank you.
Terri
It IS easy to understand with the pics,but mine certainly doesn't look as easy as your picture shows it ought to be to see the 'live' stitches on the reverse side, especially if you are knitting a mixture of k and p.Also,my pattern says to slide the needlesinto the live stitches above and below the waste yarn, whereas yours says the ones between the waste yarn stitches.As there is only one little 'row' of waste yarn there isn't a 'between' anyway!! You show a rowof waste yarn sts, then 2 rows of live stitches and then another little row of waste yarn. VERY CONFUSING!
Howmany row with the waste yarn ought there to be? When you slide the waste yarn stitches from the r.h. needle back to the left and re-knit them, are you really doing thi with your live yarn or are you doing it again with the waste yarn. Or do you actually only ever knit these the one time with the waste yarn? If so, how did you end up with live stitches to pick up in between those waste yarn stitches if there is only one row of them?
and howdo wetell which is one stitch from another when the row has k and p stitches, because they don't all look like neat little 'v' shapes in this case!
Thank you
First of all congratulations on your first baby, hope he's letting you get some sleep.
Is it ok if I link to you on my blog? I got really stuck on doing what you covered in this post so I put a link in the post to this article. And I listed you in my favourate blogs bit. Fairly determined not to lose this page. Well also I'm one of those people you put the "would it kill ya to comment" picture up for. I read but don't say much.
I've just linked to this again and it occured to me that this time i should try harder and remember to ask if it is ok. I'll remove it if you want. I'm http://spydergryphon.blog.co.uk/ here now if you want to check.
Thanks and thank you for the excellent post. It really helped me out.
Gryph
SpyderGryphon -
thank you!
feel free to post and link to your heart's content, the more people this tutorial helps the better!
Thank you for posting this article with all the pics. I'm making the Fetching fingerless gloves right now. I'm a new knitter and had no idea what waste yarn was or how to make thumb holes. Can't wait to try this technique. Your post was the only one I found that explains each step clearly. Thank you again!
Thank you so very much for your ultra clear instructions and visuals. Excellent photo details.
As my circular needles were not available - waiting to be unpacked - I used dpn's for picking up the stitches;
slid the dpns until needle tip could just be poked through one side of thumb hole to right side, while holding onto last stitch near tip;
then slid the needles through all the stitches until other end of needle could just be poked through opposite side of thumb hole to the front. Knit on from there.
This was the finishing of self designed long wrist warmers for an exchange project the next day. Love the technique, wonderful results. Thank you Thank you! (linked from Ravelry)
HI again, in appreciation I have posted your knitting aid to my knitting and completion blog. www.birdsinflight.typepad.com.
Thankyouthankyou once again! Robyn
Thank you for clarifying this method. I tried following a pattern where it asked me to do this, and I ended up making the thumb hole about half the size it was supposed to be. What a disaster! Thanks for helping me fix my mess!
This is a beautiful Tute!!!! great pictures and words.
Thank you for taking the time to do this...even if I already understood it, it's nice to read someone's well-thought-out explanation!!! (to see if I realllllyyyy understood it haha)
I've been stuck at the thumb on some arm warmers and this is the first set of instructions that has even begun to make sense. I'm going to give it a try. Thanks for the assist.
I have been looking for help with the thumb. I was totally stumped until I saw this page. Thank you for posting it! Maybe I can finish my daughters (My first time knitting mittens) mittens before Christmas!
The fear of dropping stitches had me afraid to try Fetching. Your post offered such clear instruction that I was able to successfully knit the pattern and I'm wearing them right now.
Thank you!
CAL-apparently you didn't read the entire tutorial. It clearly says to KNIT the stitches with the contrast yarn and then KNIT again with the working yarn over the thumb stitches so it will be easier to pick the stitches up.
Thanks so much for the tutorial, very helpful!
Thanks so much for the tutorial! It is so much easier when you can actually see the technique!
What a super tutorial! I will definitely by using these tips for future mittens. Thank you!
Thank GOD for your willingness to explain, take wonderful pics AND for your ability to do so. I am doing the "Fetching" mitts as recommended by my LYS owner. I had all the questions that every one else did. Now, in two minutes, I am ready to go forward. YEAH!!! Yesterday was my 73rd Bday. I began learning one year ago, from YouTube. When I can understand and do something like this thumb (which I could not quite visualize)it is sooo exciting. You are assuredly in my "How To's" Folder. Thank you again!!!
I'm a little confused... how do I do what you stated?:
Yes, very nicely done. I didn't see this on YouTube and it should definitely be there. You could do a slide show format with your pictures and the instructions. So much better than what is posted there now.
Yes! I was ready to jump into my car and head to my knit shop an hour away to get help. Now I can do this. Thank you.
Thank you so much for this! I was totally perplexed by the patterns instructions - this made it so clear.
I’m knitting a peasant thumb for the first time and I was concerned about not being able to try the mitt once I knitted in the waste yarn. I was considering putting the stitches on a holder. Following your advice resolves the problem, thank you!
I might have gotten a little too ambitious. I'm learning Selbuvotter mittens and I thought this would work better than the knitted instructions (cast off 13 stitches, reverse loop cast on 13 stitches). I wanted to maintain the colorwork pattern through the inside of the thumb, but when it came to pick up the purl stitches on the reverse side between the waste yarn purl rows, I couldn't find the purl for the contrasting color because of all the stranding (mc mc mc cc, mc mc mc cc, etc), and what I ended up picking up was the stranding so that the stitches were too big. (I'm working on 2.5mm needles with Dalegarn Falk.) I grabbed my size 0 circulars and nearly went blind trying to find the right thing to pick up. Then I knit the first round. I thought I had done everything correctly as possible, but when I pulled out the waste yarn, I discovered I had inadvertently knitted the thumb hole together again. I don't understand how I did that. I carefully pulled out the new stitches leaving live stitches exposed. Not so scary with Falk; it's a pretty grabby wool. But it is superwash, so I'd be concerned about steeking it partly because the thumb needs to move and steeking can impede movement. So I picked up the live stitches and started again. I'm now halfway through the thumb, but I will definitely need to go back in with waste yarn and patch the holes on either side of the thumb. I think what I need to do is try this on a swatch instead of Christmas mittens with a bigger yarn and needle so I can see what I'm doing. It was an adventure to say the least. But I know it will work. It will just take some practice.
I love this technique and am wondering if it would work on mittens with gussetted thumbs?
So true
I have not been able to complete my mittens because I couldn’t figure out the thumb. Thanks so much for sharing.
Post a Comment